
How I Did It: No Cut Silhouettes
We are kicking off a new blog series here at TPW. It’s called “How I Did It” and we plan to showcase short tutorials from our members on a variety of interesting topics. Today we have Karin O’Brien sharing an idea with us that she did with her daughter’s preschool class. We are sure you have probably seen the latest craze of cut-out silhouettes of childrens’ profiles. Karin has removed the task of cutting and replaced it with a simpler approach: an off-camera speedlight and a couple of Lightroom sliders. Easy peasy!
Here’s how to create No Cut Silhouettes in a few easy steps, for less than $0.25! If you have a working knowledge of Lightroom, Photoshop and an off-camera flash this will take you approximately 30 minutes start to finish. I have to say, there are MANY tutorials out there for capturing your kid’s silhouette. I spent the better part of an evening going through them, but none quite seemed to fit what I was working with. I needed to create silhouettes for “L” week at my daughter’s pre-school (L for Light / Dark – they were talking about light and shadows). That means about 15 or so kids – and I did NOT want to spend that much time cutting ANYTHING out, let alone trying to convince a bunch of 4 year olds to sit still while I trace around them. No Thanks. My hands just hurt thinking about it!
Since I couldn’t find exactly what I was looking for, I tried my own roundabout way of making it happen! Worked out wonderfully!
Gear needed: Chair, light-ish colored wall, Off Camera Flash, Camera and tripod.
1. Set the chair about 3 feet away from the wall
2. Place the flash on the ground between the chair and the wall (I used the speedlite stand that came with the flash) pointed at the wall, and angled about 45degrees up.
3. Settings: This will vary depending on your ambient conditions, but for this quick and dirty project I just eyeballed everything. I set the shutter speed to 1/250, ISO 400, F/5.6. The flash was set to Commander mode, Manual and ½ power.

4. Bring in the Clones! Or Silhouette makers! If you’re doing a group of kids (like my daughter’s preschool class), it’s a great idea to take a photo with no flash before, just so you can see to whom the silhouette belongs.
5. Take photo, and bring into Lightroom.

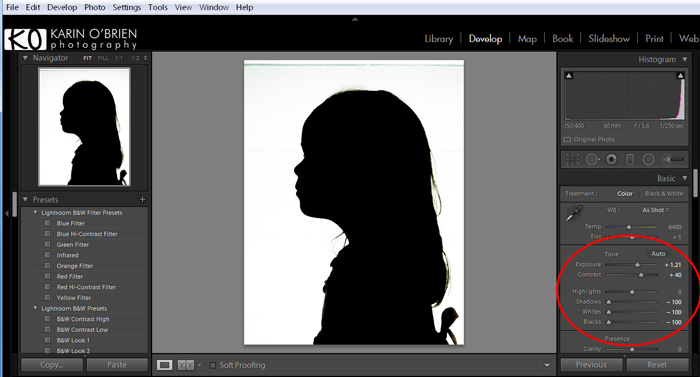
6. Adjust exposure and contrast up, and then crank the shadows, whites and blacks all the way down to -100. This should get you pretty darn close to the final product.

7. Bring into Photoshop, and clean up anything Lightroom didn’t take care of. You could use the clone tool, or stamp tool or even make a quick mask since the edges are so distinct. I chose the latter.

8. Voila! All that is left is to print, or send to your printer of choice. It looks particularly crisp on 100 lb. bright white cardstock (and won’t drain your own black ink!). I sent these to Office Depot for less than $0.20 per print.


 Karin O’Brien
Karin O’Brien is a rugby player turned Engineer turned Photographer who is constantly striving to learn and live her life as her best self. A Michigan native, she currently resides in Morton Grove, Illinois with the love of her life and her two deliciously crazy children, and continues to root passionately for Detroit sports teams despite being bombarded by Chicago lovers at every turn. She is a great purveyor of hugs, and loves to celebrate the everyday victories. She brings her vibrant personality and enthusiasm to photographing various special events in the Chicagoland area, and is dedicated to the preservation and veneration of the childhood Lovey.
Tags: how to photograph a silhouette, idea for preschool class project, kids silhouettes, no cut silhouette, personal photography project, photo craft
Categorized in: Guest Bloggers, Tips & Tricks
4 Comments
sooo clever and simple, Karin! Thanks for sharing <3 Pinning this one for sure 😉
Written out it looks so much more difficult than it actually was! LOL 🙂
Ooh fab. I’m looking forward to trying this, if l can get my toddler to cooperate.
Oh my goodness – this is awesome!!!! My sister has been asking for one of these of my kids! I never knew how to do it and now I’m going to give it a shot. Thanks for sharing your tips Karin!!!